Monday, December 31, 2012

I Don't Normally Wear Glitter, But When I Do . . . I GlitterBOMB!

Hey guys! I have something fun and exciting to show you today. I decided to do 
New Year's nails! I'm not going out partying of anything, but I am going out to dinner with the family, then having dinner again with the bf's family, Double Dinnering lol! So I'll stop holding you in suspense, here is my last mani of the year! btw, I hate the word mani and I resolve to stop using it in the new year...
ISN'T it AMAZING?!?! I decided to do a glitter gradient. I figured hey, this is probably going to take me like 2 hours to take off, so might as well make it worthwhile!

Today we actually had sun for the first time in about a month. So enjoy this lovely sunlit picture courtesy of Mr. Sun! 

For this look I started of with 2 coats of:

Butter London ~ Lovely Jubbly courtesy of GLYMM (a beauty sample subscription service in Canada). 

This is my first Butter London so that was exciting, and did I mention it was FREE?! I used my glymm points to get it ;) I chose this as my first BL because of pictures Carly from Lacquered Lover posted. Also, how fun is it to say "Lovely Jubbly"!

 Blurry shot so you can appreciate the sparkly  
Next up is: Nails Inc. ~ Marylebone, a lovely pink/silver glitter polish from their special effects 3D glitter line. 

I don't have that many Nails Inc. polishes. I tend to buy only the special ones like the Gossip Girl Flakies, Crystal Caps (did I mention I like sparkly things?), magnetics... they are quite pricey here ~$13. I got this one during the Sephora VIB 20% sale. 

I think what puts me off is their names. I believe they use places in London and street names and such to name their polishes, which is cool, but damn hard to remember. How does one even pronounce "Marylebone"? 

Nonetheless they have some interesting collections coming out next year so be sure to keep an eye out for Nails Inc.!

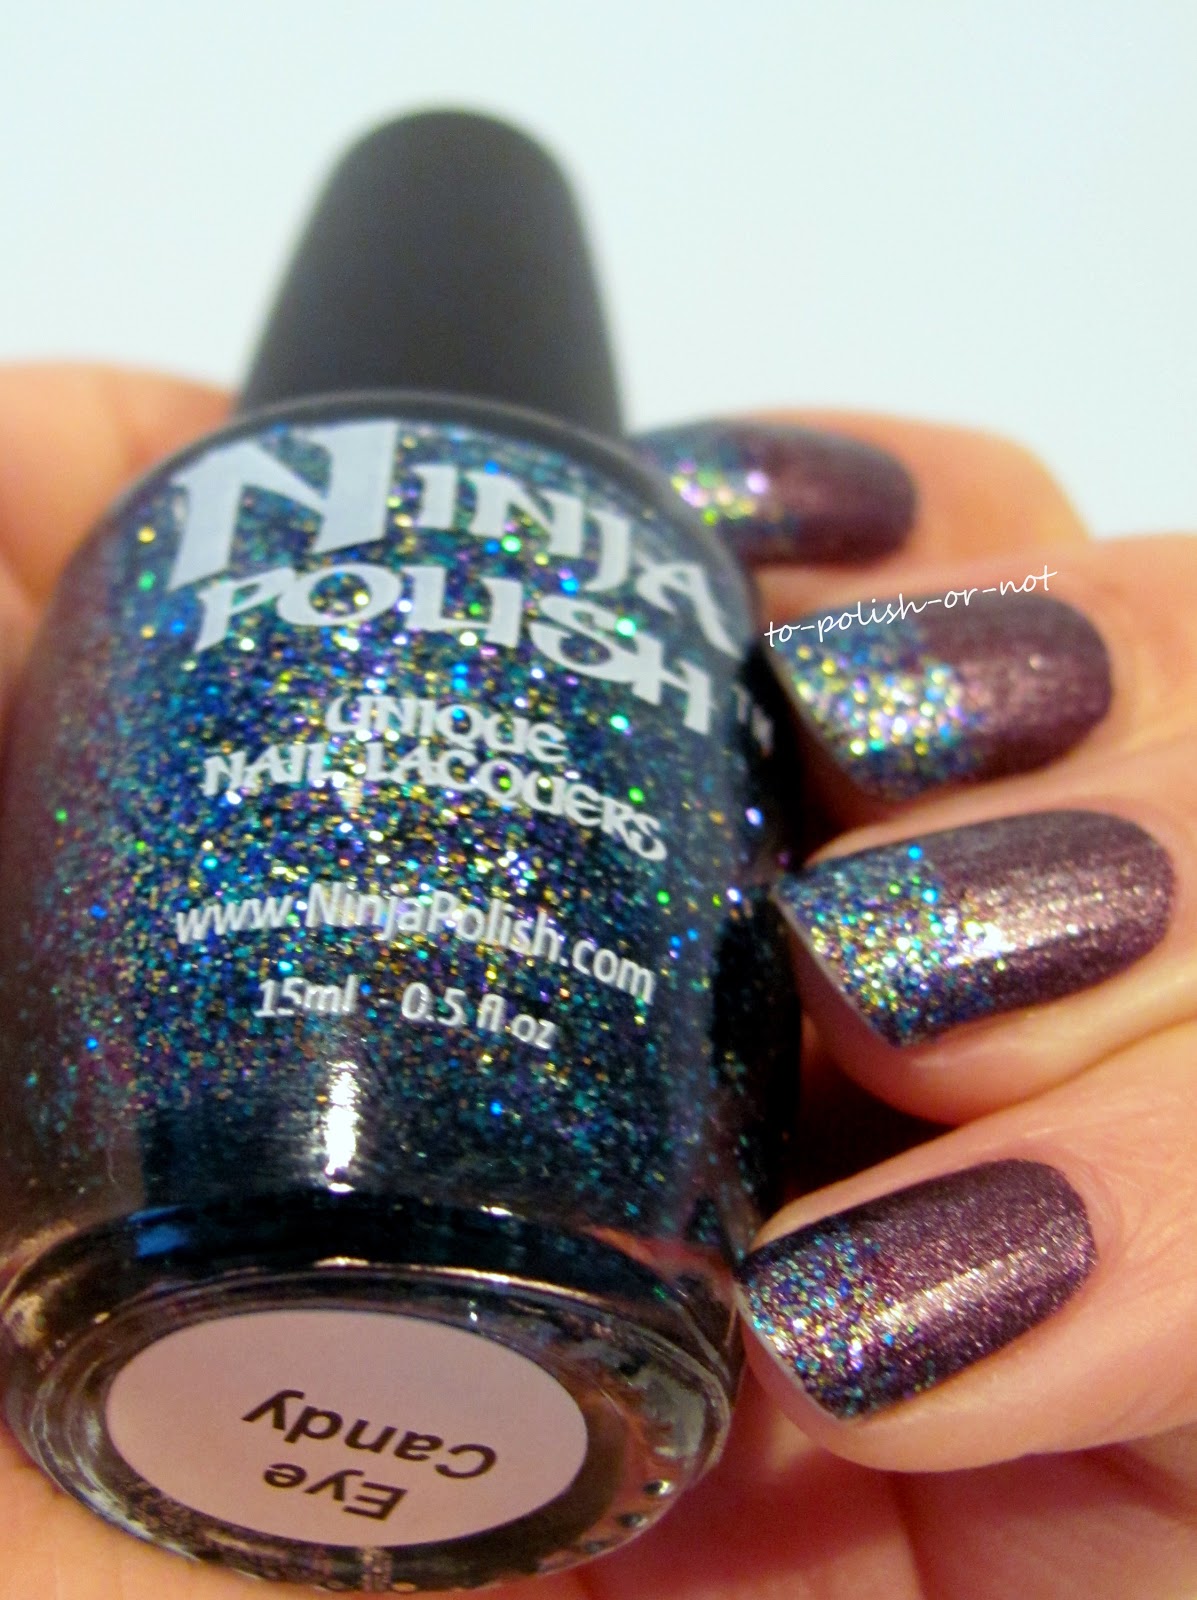
Finally, I coated the tips in 3 coats of: Finger Paints ~ Santa's Magic, my official new favourite glitter as it combines sparkly and holo! By the way, these pictures in no way do these polishes justice. They are just so sparkly! Like blindingly, distractingly, stare at them for hours on end sparkly!

At this point I felt I may have overdone it just a bit... but hey, might as well make it worth it and close the year with a bang right? 

'til next year 
<3 Kim


Sunday, December 30, 2012

Ninja Polish Eye Candy and OPI LPAD Suede!

Today I decided to combine Suede and Glitter polishes! I was wearing OPI ~ Lincoln Park After Dark Suede for about a week. It's a great polish to wear if you don't have time to wait for the polish to dry! Then I got my Ninja Polish order in the mail. I had some tip wear so I decided to put some glitter on in a sort of half french, half gradient manner.

Eye candy is a beautiful glitter and it really goes well with the suede polish. It's more subdued then your typical glitter polishes, but just as sparkly!
Both OPI~ LPAD Suede and Ninja Polish ~Eye Candy are must haves!

Until next time <3

Friday, December 28, 2012

Ninja Polish and China Glaze Haul!

I've been waiting to get my hands on these Ninjas for a while now!I was lucky and managed to get Girly Floam, Carribean Reef, Hanukkah Floam, Eye Candy, and Shattered Star! I also grabbed my first 2 Jades: Fascinio Violetta and Energy, two lovely holos.


I was also lucky to snag all those China Glaze for $1 each! They are minis, but I love minis! The full bottles 14ml sell for about $7-8 here so $1 ($2 including shipping) for 9.6ml is a pretty wonderful deal! I also got OPI mini of Glow-Ink the Dark. I'd say this haul was a little Christmas present to myself =)

Thursday, December 6, 2012

Dotty art just for funsies!


So I decided to do some just for funsies nail art on my Color Club Silver Holo... Harp On It? Does anyone else find the names of the Color Club Halo Hues really hard to remember??? 

Anyways lol... I actually found myself bored of the holo YES it's possible, what's wrong with me right? so I added some designs using a dotting tool with Claire's Mood Polish in Excited/Bored. I just received this polish from my amazing friend Marissa, along with many other fun colour changing polishes. It was a fantastic surprise!

The mood polish changes from orange (cold) to peach (hot) but my hands are always ice cold so all you can see is the orange.
I'm curious to see how this mood polish would work stamped over a light colour. It might have a really cool effect, especially with long nails. 


Hope you enjoyed and won't hate on me for covering up a holo =p

Warm Hands & Painted Nails

I joined 2 swap groups for this Christmas season. Here's my first one: 

Warm Hands & Painted Nails

I was paired with a lovely lady from Quebec! I've never met anyone from Quebec before and this happened to be my first domestic swap if you can believe it! Lia was super nice and found me some awesome goodies! For this swap we had to include a pair of gloves/mittens and a bottle of polish, then whatever extras your heart desired. So what are we waiting for?? Let's take a look at what I got!!

The parcel itself was wrapped in gorgeous paper!
Under the wrapping was a gift box filled with all my goodies and a lovely card =)
Awesome tetris packing skills!
All the lovely goodies! I wanted a cute pair of knitted mittens and these will go perfect with my grey jacket. The blue scarf is also of a style I've been admiring but I probably would be too scared to buy it and try it myself lol...there's also some chocolate and candies, make up wipes, nail sticker strips and oh of course we can't forget the polish!!!
Can you believe I don't have any of these?! I'm super excited to try the Jacob and Bizou as these are completely new brands to me. The OPI is also lovely and will be a great addition to my minis army =) I love all these colours, especially the Jacob one! Can't wait to try them.

And since it's always more fun to see both sides of a swap, here's a look at the package I sent her from Vancity =)
And we can't forget a close up of the pretties! She really wanted to try China Glaze and OPI so I did my best to find her some brands she's yet to try =)
I really love doing swaps! It's a great way to get to get to know people better and it's so much fun buying stuff for others! Now I just need to wait one more day to open my SPS swap package! 

Wednesday, December 5, 2012

Really, that stamp again??

So I was looking through some old pictures that I never ended blogging about because I tend to be lazy and disorganized...and came across this stamping design. I did it way back in August?? It was supposed to be part of my 31 day challenge that I totally failed at... =p Well anyway, I legitimately think I have a problem because out of the maybe 10 times I've actually done stamping designs, I've used this image at least 3 times...
The stamping plate I used once again is BM-315. 
 I believe this is most likely:
 Sally Hansen Insta-Dri ~ Silver Sweep 
over 
OPI DS ~ Signature
Hope you like it as much as I apparently do!

Tuesday, November 20, 2012

November 2012 Topbox

Here is a look at my first Topbox box! It comes is a paper wrapped cardboard tube. Definitely a different and reusable form of packaging.

Topbox is a beauty sample subscription box available in Canada. You pay $10 a month and receive a package each month with at least 4 deluxe beauty samples (Although starting in December boxes will be $12/month)

I've been on the waiting list for topbox for 6 months! So was this box worth the wait and does it live up to the hype? Read more to find out what I think =)


I received 4 items in by November box. 
A nail polish, a perfume, a mascara and a butter. 


1) Benefit ~ They're Real! Mascara


I really love Benefit products, but unfortunately I can't use non-waterproof mascara. So until I find a way to make it work for me, this will be sitting in a drawer or going to a friend. 

This is a pretty nice sample though. 
Full size = $29/8.5g
Sample size = $10.24/3.0g


2) Cuccio Naturale ~ Pomegranate & Fig Butter

This sample was interesting. When you take the lid off, you need to cut the nozzle to open it. I think there should have been instructions because I wasn't sure if it was supposed to be sealed like that...Nice product though. Nice light scent and non-oily.

Full size = $18.95/240g
Sample size = $0.72/9.24g

3) Pandora's Make Up Box ~ Perfume + Polish ($24.50/pair)
These two items were interesting, they are a paired polish and perfume, both in nail polish bottles. I got Citrus Playful, a bright coral red. This is definitely not one of my go-to colours, but I'm glad I can add this to my stash. It's a really pretty colour. The formula was ok, opaque in 1 coat but I did 2 for good measure. There was a bit of streaking and pulling when I applied top coat, but the polish was pretty decent. 

The perfume has a light citrusy scent that's not bad at all. It's a neat idea having it in a nail polish bottle, definitely something different. I don't know if I would value this set at $24.50 though. 

I thought this box was ok. The benefit product was great, but unfortunately something I can't use. The butter was nice, but not even worth $1. The polish + perfume set was cool and a fun addition to my collection. I know some people got China Glaze polishes which would have also been cool. I'm glad I didn't get the Vera Wang perfume sample as I already have it. I do wish I had received the MUFE eyeliner though, or the lip stain some people got. Overall I was content with the box. Hoping for nice things next month!

Topbox is changing their prices from $10/month to $12/month as an attempt to provide better samples and also provide free shipping on their newly launched online store. Personally I think they should have kept the boxes at $10 and charge people shipping for buying extra items, but obviously it helps their business to give the discount to people spending extra money at their store. Hopefully this price increase does translate to better samples =)

Are you interested in joining? Sign up now to reserve your spot on the wait list.
Already signed up? What did you get in your box this month? Thoughts?

Sunday, November 11, 2012

Color Club Halo Hues ~ Cloud Nine


Today I decided to try my first of the Halo Hues. This is Cloud Nine, a light pink-lilac colour. 

As I applied this polish I was a bit disappointed in the colour. This is supposed to be the "purple" of the collection so I wished it would be a more vibrant purple. It kind of reminds me of Glitter Gal Frappe, but not as sheer. 

The formula was ok, better than nfu oh/gosh/layla/MUS, but not as good as OPI/Jade. I'd say it's on par with the china glaze OMGs. It was a bit thick and there was some pulling and streaking. I ended up using 3 coats followed by Revlon Quick Dry Top Coat. It did dry fast though which was nice. 

This would be a good colour for someone looking for a more neutral, but still in-your-face-holographic polish. The base colour is quite dull. I'd show you but I wasn't able to capture it in a photo, maybe in cloudy daylight it would work. Under every light source I tried, all I could get was holographic rainbows!


Many of the pictures show a blue cast and that's because 
the holographic effect is just so strong!


Below is a picture under the least rainbow inducing artificial light source I could find!


In the end, I was pleasantly surprised with how holographic Cloud Nine was. That quality definitely makes up for the dullness of the colour. If you love holos I'd say the Color Club Halo Hues are a must!


**Edit. Here is a picture I took in cloudy daylight the next day =)

I really love how Cloud Nine has a foil look. It's not matte like the nfu oh/MUS/Gosh/Laylas. It gives the polish dimension and even in the shade it still looks gorgeous!

This polish is definitely one of the most holo I own. I'm looking forward to comparing it to others. 

Any suggestions what I should compare it to??

Color Club Halo Hues Collection!

Here is the Color Club ~ Halo Hues collection! A group of 6 beautiful holographic polishes. 

L-R: Cloud Nine, Halo-graphic, Cherubic, Angel Kiss, Blue Heaven, Harp On It. 
 I've finally been able to get my hands on them! They were supposed to be released in Aug/Sept but my local supply store has just received their stock. They are also twice as expensive as the regular color clubs =( but these polishes look very holographic in the bottle and I can't wait to swatch them and compare them to other holos. I'm glad color club is stepping up to the plate and coming out with holos! I also love the silver caps! They are much sturdier than the OPI and China Glaze ones.
Above is with flash and below is in natural light. 
Check back soon for swatches!

Have you been able to find these polishes? If so, where?

Thursday, November 8, 2012

The Polish Bar - Satellite

Hello everyone! Today I have a gorgeous indie polish from the UK to show you!! I don't own very many indie polishes at all (tops 10), but when I saw this polish featured on Holographic Hussy, I headed straight to Etsy and placed my order! So without further ado, here is
 
The Polish Bar ~ Satellite:

I'm wearing 2 coats of Satellite over BYS ~ Magenta.

I'm really not a glitter person, but this polish is just so amazing!! It applies like a dream, dries quickly and has the perfect combination of glitters!! There are hexes of all sizes and colours. I can see blue, pink, silver, limegreen. AND AND ANDDDD they are ALL holographic glitters!!!! Talk about some in-your-face sparkle! At every angle you can seem some of the glitters "glowing".


You can buy this polish on Etsy and I highly recommend you do =)  this polish is truly magical!

So what are you waiting for?? Go! <3 Kim

Wednesday, October 24, 2012

Why don't I have more MOOD polishes???

Ah it's been so long since I last posted! I've just been sooo busy lately. But I have something awesome to share with you today... 

BYS Magenta

This is an awesome colour changing/mood polish that I got from Australian brand BYS. 

They also make really cool "cracked" polish which I'll show you eventually!" 

This is my first and only mood polish and I NEED MORE!! They are just too cool!

(please ignore my messy nails, these pictures were taken a week after I applied the polish!)

BYS Magenta shifts to a bright jelly-like pink when it's warm, 
and a dark eggplant purple when it's cold.

This is what the polish looks like when my hands are warm. The tips are purple because the free edge of my nail is cooler.
It's like a cool instant gradient!
 Here I dipped my middle finger and pinky in hot water, and my ring and pointer in cold water!


I think one of the reasons I've waited so long to try these mood polishes is because people say the effect is only cool if you have long nails. And most of the time I do not have long nails... While having longs nails creates an awesome effortless gradient look, most of the time my hands are so cold that the polish was always purple.

Even if you have super short nails, this polish is still AMAZING!! For those of us who are easily amused, you can spend a good amount of time changing the temperature of your nails and watching them change colours...so what are you waiting for??? Go out and get some mood polish!

--Kim <3

Saturday, August 11, 2012

31 Day Challenge ~ Day 11: Polka Dots

Today's Challenge is: POLKA DOTS!

I didn't necessarily do POLKA dots, but I did do DOTS! Well dot-shaped blobs lol...

I'm just starting to try and figure out the technique of using a dotting tool. As you can see I'm having some issues with making my dots actually round...
I really do love how this turned out though! In person, the purple is so deep and the golds are so sparkly! It looks super fancy-shmancy.

Rimmel ~ Night Before is the base, and the dots are 
OPI ~ Designer De Better and Orly ~ Luxe

This look kind of resembled some sort of an animal print too, but I can't quite pinpoint what one...

Check back tomorrow for Day 12: Stripes=)

Also check out everyone else doing this challenge with me:

31 Day Challenge ~ Day 10: Gradient

   Today's Challenge is: GRADIENT!

I didn't have sponges with me (which is how I've learned to do gradients) so I decided to use a stamping technique for my gradient!

For this look, I first painted my nails white (this makes the neon colours look more vibrant!) Then I used the image plate 
BM-319 to stamp the neon gradient.
   
For the gradient, I used an assortment of bright colours, Color Club neons, OPI ~ Fly and Orly ~ Frolic. I lined up the bottles in a row, pink, yellow, green, blue, purple. Then I unscrewed all the lids so I'd be able to work quickly. 

On the image plate, I put a drop of each colour of polish beside each other and slightly overlapping. Once there was a drop of each colour, I scraped the polish across the image once, then once again to help the colours blend, and voila! You can see on the pinky I scraped too many times and the colours mixed too much and became muddy. It really is quite easy once you get the hang of it! 
Check back tomorrow for Day 11: Polka Dots =)

Also check out everyone else doing this challenge with me:

31 Day Challenge ~ Day 9: Rainbow

Today's Challenge is: RAINBOW!

For this challenge I decided to do skittles! (Each nail a different colour) I really really liked how this turned out! I used Color Club neons, OPI ~ Fly and Orly ~ Frolic.

I then used image plate BM-315 to stamp the criss cross pattern. For each nail, I used the colour on the adjacent nail beside it for stamping. So the yellow nail had pink stamping, the green nail had yellow stamping etc. 

I think my favourite colour combos are the teal and purple nails!
 Check back tomorrow for Day 10: Gradient =)

Also check out everyone else doing this challenge with me:
Related Posts Plugin for WordPress, Blogger...