Showing posts with label Nail Art. Show all posts

Saturday, November 29, 2014

Bello! Me Want BANANAnanana!

Hello beautiful people!

Sorry, I've been away for so long. Unfortunately I haven't been able to do much with my nails because of school/work requirements. But lately I've found the time to start working on my topolishornot jewellery again! Check back here and at my Etsy store often for updates on new pieces! 

For now I leave you with this amazing set my friend Anisha did! I can't wait till the minion movie comes out!

Thanks for stopping by, 

~ Kim

Thursday, June 27, 2013

Tuxedo Nails!


So I've kinda been obsessed with rings lately... so I'm going to try and integrate them into my nail looks? every now and then! (Seriosly, there must me another word for mani...) 

I just love how cute this bow ring is!


Anyways...I started painting my nails one night at around midnight. I was using this Sexy Bomb polish that's a dark brown-green duochrome. It seemed too dark alone, so I added gold tips and little dots as an accent. 

I'm not totally sold on this look, but I did get a lot of compliments at work. I may try it again with a different colour palette. 

ps. I must share these shoes I just got that I absolutely adore! They're black flats with gold mirror toes! So much fun! ANDDDD they were only $8! 


Also, be sure to check out this article I did on affordable fashion for the fashion site: What She Wears


That's all for now, thanks for visiting my little spec of dust in the interwebs =)

Thursday, December 6, 2012

Dotty art just for funsies!


So I decided to do some just for funsies nail art on my Color Club Silver Holo... Harp On It? Does anyone else find the names of the Color Club Halo Hues really hard to remember??? 

Anyways lol... I actually found myself bored of the holo YES it's possible, what's wrong with me right? so I added some designs using a dotting tool with Claire's Mood Polish in Excited/Bored. I just received this polish from my amazing friend Marissa, along with many other fun colour changing polishes. It was a fantastic surprise!

The mood polish changes from orange (cold) to peach (hot) but my hands are always ice cold so all you can see is the orange.
I'm curious to see how this mood polish would work stamped over a light colour. It might have a really cool effect, especially with long nails. 


Hope you enjoyed and won't hate on me for covering up a holo =p

Saturday, August 11, 2012

31 Day Challenge ~ Day 11: Polka Dots

Today's Challenge is: POLKA DOTS!

I didn't necessarily do POLKA dots, but I did do DOTS! Well dot-shaped blobs lol...

I'm just starting to try and figure out the technique of using a dotting tool. As you can see I'm having some issues with making my dots actually round...
I really do love how this turned out though! In person, the purple is so deep and the golds are so sparkly! It looks super fancy-shmancy.

Rimmel ~ Night Before is the base, and the dots are 
OPI ~ Designer De Better and Orly ~ Luxe

This look kind of resembled some sort of an animal print too, but I can't quite pinpoint what one...

Check back tomorrow for Day 12: Stripes=)

Also check out everyone else doing this challenge with me:

Monday, July 9, 2012

Nail-Venturous Rustic Remains

Isn't it lovely?? Nail-Venturous ~ Rustic Remains is a sheer copper flakie polish that looks amazing layered over black! 

Here I have 2 coats on over my black polish design 
(which kind of looks yin-yang-y/comma-y/melted-hersheys-kiss-y now that I look at it lol...) 

The black really brings out the wide spectrum of shimmer in this polish.


I just think this polish is super cool =) It's so unique! I also love the simple design I came up with. When I lay my hands flat, my nails look different when viewed from each side. It's simple but fun!


Thoughts???

Tuesday, July 3, 2012

Antique Stamping

Hello Everyone! I decided to stamp on Wet n Wild ~ Disturbia to liven it up a bit! My friend Anissa suggested I use gold! Gold was a lovely choice and the gold and purple together look very regal!
I used an image on the stamping plate BM-214, and I stamped with China Glaze ~ 2030. A beautiful chrome finish polish from their 2009 Khrome line! I aligned the stamps differently on each nail so it wouldn't be so uniform.

I wanted to also use BM01 but the image wouldn't pick up for me. The images didn't transfer cleanly (and I think that may have had to do with me trying stamping outside for the first time with sun and wind affecting dry times...) but I like how it gives it an antique-y look. It reminds me of some of the filigree ring settings I ordered to make polish jewellery! (More on that later)

Hope you enjoyed! Thanks Anissa for the fantastic idea!


Monday, June 25, 2012

My First Attempt at Gradient Nails!!!

Today I'm super excited to show you my first attempt at a gradient manicure!!!
I've wanted to try one of these for so long and I've finally found the time to do it!

Of course I had to use my favourite colour, TEAL!!! I think I went a little overboard on the polishes... probably could have used only 2 or 3, but HEY it was my first time =p


^ Here's what I used to achieve this look, and what it looked like before clean up ^

(She does the best stamping and gradients!)
Essentially I put lines of each colour next to each other on foil, then used a make up sponge to grab the polish and sponge it onto my nails. It was surprisingly quick and easy! The colour builds up to opacity really fast! 


Just make sure you keep enough polish on your sponge, or else you get bits of sponge sticking to your nails...which no one really wants... Also wait for your nails to dry before top coating, to prevent ugly air bubbles... (this is why I do my right hand first!)

The end results of this process was so amazing! I couldn't stop staring at my nails/making other people stare at them! I even had a few customers at work ask me where I got my nails done! I was so flattered!


And here's my right hand --->
I was really tempted to stamp over this, but I didn't want to risk ruining my success. Maybe next time! I'm glad to add gradients to my repertoire of nail art! I'm also excited to try gradients with different colours! Wish me luck!

Hope you enjoyed, because 
I sure enjoyed creating this look!

What colour combo should I try next???

Tuesday, June 12, 2012

Neutral with a touch of colour

Here's a simple look I did with some of my new     
   mini polishes. I used the nude as the base then 
   did a subtle accent nail with rows of dots in 
   orange, pink and teal. 

   What do you think? I kind of love how it doesn't  
   really look like I'm wearing polish.


Monday, February 20, 2012

Stamping ~ Pure Awesomeness!!!!

Here's my latest stamping attempt!!

Here I have:
Color Club ~ Where's the Soiree stamped over 
China Glaze ~ Let's Do It In 3-D with plate BM-221
(Please don't mind the messiness, I have yet to master the art of clean up.)  
Sometimes my nails catch the light and a beautiful holo rainbow appears under the black lines! I put a layer of topcoat over the black to protect the stamping but unfortunately this dulled out the holo. This look was super easy to do though! After the base colour was dry on my nails, it only took 10 minutes to do all the stamping!!! At work I got so many compliments! One lady even said that it probably cost a fortune to have had my nails doneShe was shocked and amazed when I told her I did them myself. I'm very glad I started trying out stamping and I look forward to my adventures with other images!

This is definitely a quick way to get lovely professional looking nails!

Thursday, February 16, 2012

Stamping ~ My First Attempt!

Here's my first little attempt at stamping
It's Sally Hansen Insta-Dri ~ Silver Sweep over a teal Sexy Bomb polish =D
With and without flash. Plate BM-203
It was fun! I look forward to trying out the other designs!

Thursday, January 5, 2012

OPI SILVER SHATTER SAVES THE DAY!!

I've been hesitant to use Shatter lately because my Shatter doesn't always shatter, and there's nothing worse then doing a cool idea only to have your black shatter cover it all up! This time though, I used Shatter to save an old mani that was starting to chip
I had Ludurana Emocianante on for 5 days. There was no tip wear, but I was getting some chips. (I am quite impressed with this polish. I was lazy so it had no base  or top coat, just 2 coats of Emocianante and no black base coat is needed! I'll post pics of it alone later)

For my first day of school I wanted my nails to look good, so I threw on some OPI Silver Shatter! I wasn't sure how well it would shatter over long-dried polish, but I was willing to take the risk of it not shattering, since my base polish was already worn and chipped. I was also short on time and Shatter dries super quick

I then topped off the shatter with a coat of Ozotic 506. The Ozotic multichromes are sheer and awesome for layering! Doing so actually made the Shatter separate even more! It was so cool to watch. 

Since Shatter leaves the nails bumpy, I had to top coat it! I don't use Seche Vite and I was too lazy to even wait for my quick dry top coats to dry, so I used a matte top coat! Like Shatter, mattes dry super fast and you can watch them as they dry! I don't always have time to sit around and watch polish dry! I have things to do and places to be! Watching polish dry is reserved for exam studying time!! LOL...
I really like the depth this look creates, while keeping the nails smooth to the touch. Since the base colour was a multichrome, you can also see the colour change! It's not as intense matted as glossy, but you can still see a definite change from blue-purple to purple-pink and even to orange at sharp angles.  
Here are the full names of all the polishes I used:
~~Ludurana Aurora Boreal Emocianante~~
~~OPI Silver Shatter~~

~~Ozotic 506~~

~~Joe Fresh Matte Top Coat~~


More pictures after the jump =)

Sunday, December 4, 2011

My nails for the "Yule Ball"


The other night I went to a "Yule Ball" (yes, like in Harry Potter) with my bf. Here's what I did for my mani to match my dress!


click photo to enlarge -->>


Base coat = OPI Nail Envy S+P
Base of the nail = China Glaze OMG
Free-handed half moon (I didn't have any of those round stickers) =
OPI Russian Navy Suede
Index + Ring finger tips = OMG
Top Coat = Revlon Quick Dry


Here's a close up of the nails and the pattern on my dress.
We had some SUN today, so here's a sunlight photo!
Here's what it looked like before I used top coat.
**NOTE: Russian Navy Suede is NOT easy to clean up! A brush and acetone can pick up the blue, but then I was left with the silver shimmer stuck to my skin (as you can see here)! To fully clean it up, I had to soak my hands in water and scrub, but that didn't fully work, so I plopped on lots of cuticle oil and let it soak. I also found that at the places on my skin that got covered in top coat, the silver shimmer would just peel off with the top coat, which made it really easy to clean up.

Just thought I'd warn you in case you plan to polish and head out! If anyone knows an easy way to clean up suedes, please let me know
 =)

Hope you enjoyed!


Saturday, October 29, 2011

My Halloween Nails!

Hello! Sorry it's been so long since I've last posted. School's been pretty hectic, but I've been taking pictures of all my polishings to show you later! I'm also working on a post about dusty hunting since I've received many questions from people wondering how to find old HTFs (hard-to-finds).

While the rest of my posts can wait, I figure I should at least get my Halloween one up before Halloween! so here it is =D I wanted to do something festive, but not too in-your-face, because I have work all day tomorrow! I think this simple design worked very well =)

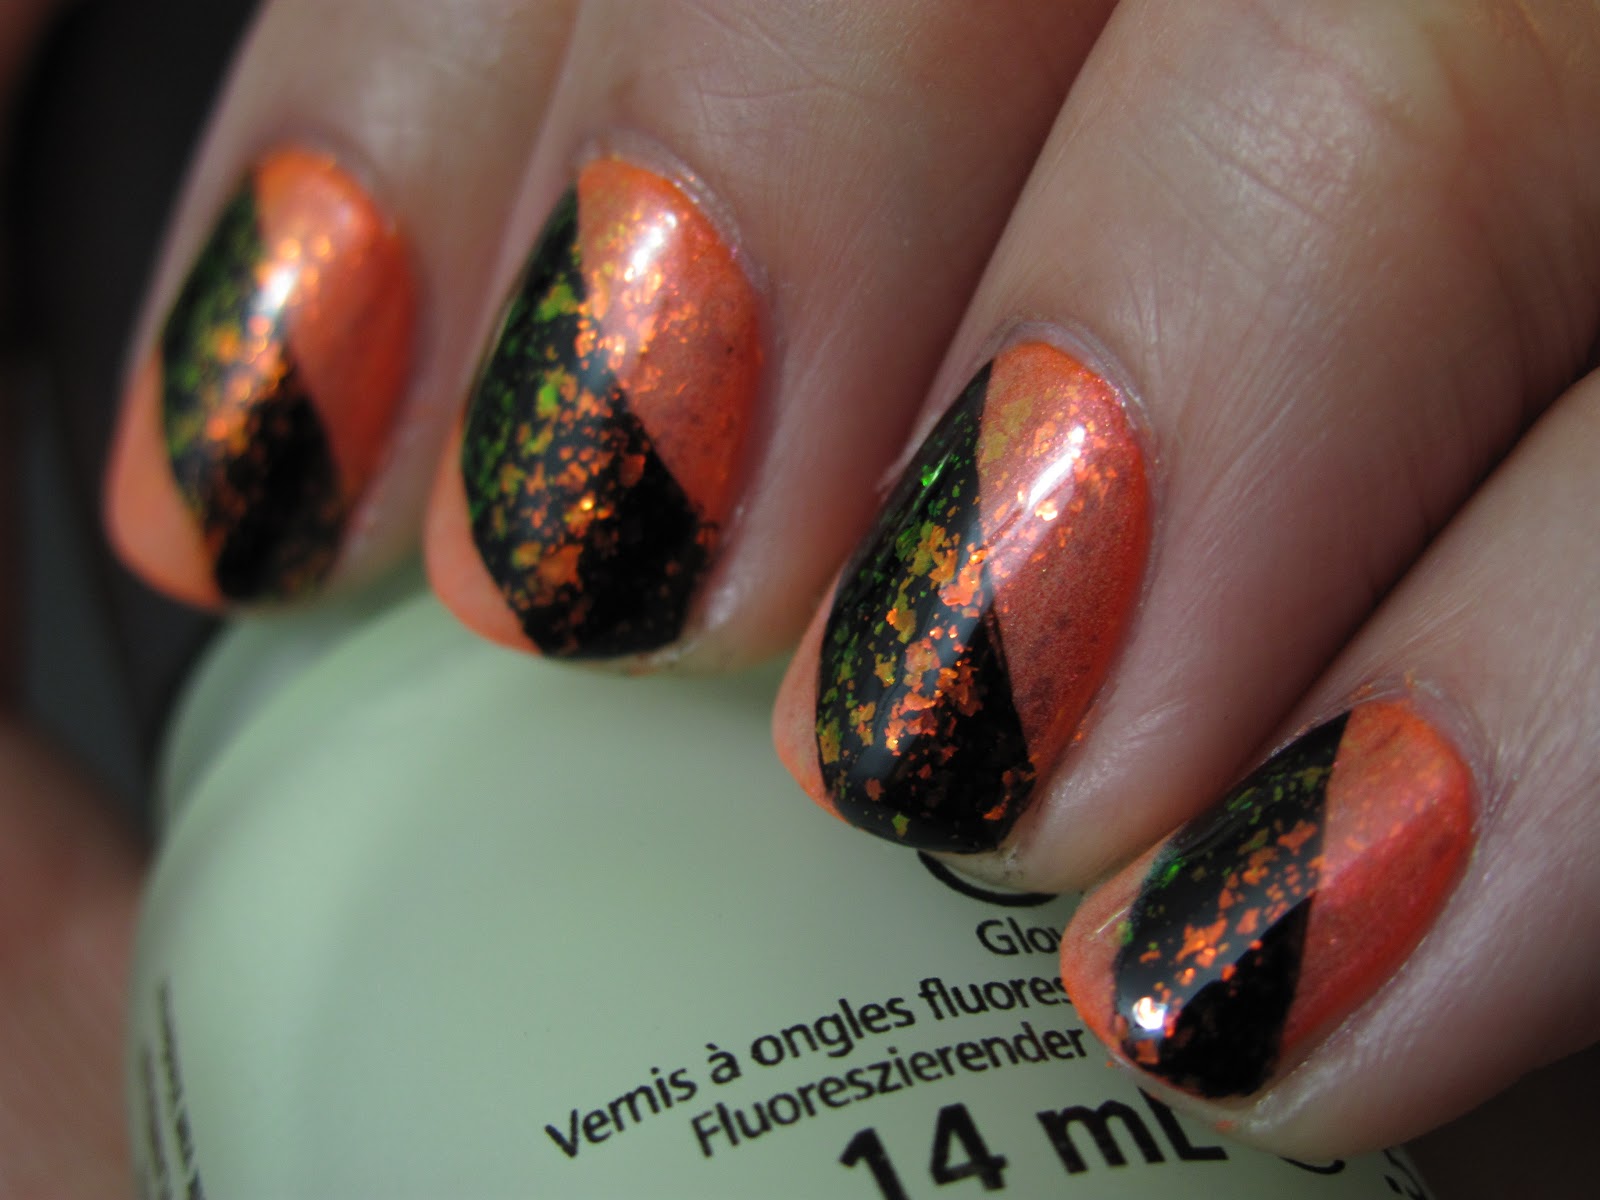
I used: Color Club - Polish For All // Nina Ultra Pro - Molten Gold // China Glaze - Liquid Leather // Nubar - 2010 // China Glaze - Ghoulish Glow


This is 2 coats of Polish For All, then Molten Gold was used to dull out the orange, as it is very VERY NEON! Molten Gold is a gorgeous sheer pink-orange duochrome. I then used a brush to paint the black diagonal lines, it came from the set I got off eBay. Lastly, I used 2010 over the entire nail and topped off the orange sections with 2 coats of Ghoulish Glow! Ghoulish Glow is a great glow-in-the-dark polish. It is fairly clear and produces a good glow-effect with two coats.

Here is what Polish For All looks like alone. It is even brighter in real life! It came in the Color Club Pride set.

When I first got Nubar 2010, I knew that I'd be using it for Halloween. I'm not a huge fan of the orange-green flakies, I'm still looking for the perfect blue-duochrome flakie, but I think 2010 worked perfectly here!
...and here is what it looks like when it *glows in the dark*!

***Did you do Halloween nails?? Comment with a link so I can check them out!
Related Posts Plugin for WordPress, Blogger...